
Montessori Cosmic Education nurtures curiosity, imagination, and a sense of purpose through integrated learning, storytelling, and exploration of the universe.

Help children navigate social conflicts with empathy and problem-solving. Learn how to reframe tattling, guide constructive conversations, and build independence!

Discover four key strategies to strengthen your parent-child connection: understanding mistaken goals, using playful parenting, scheduling special time, and creating visual routines.
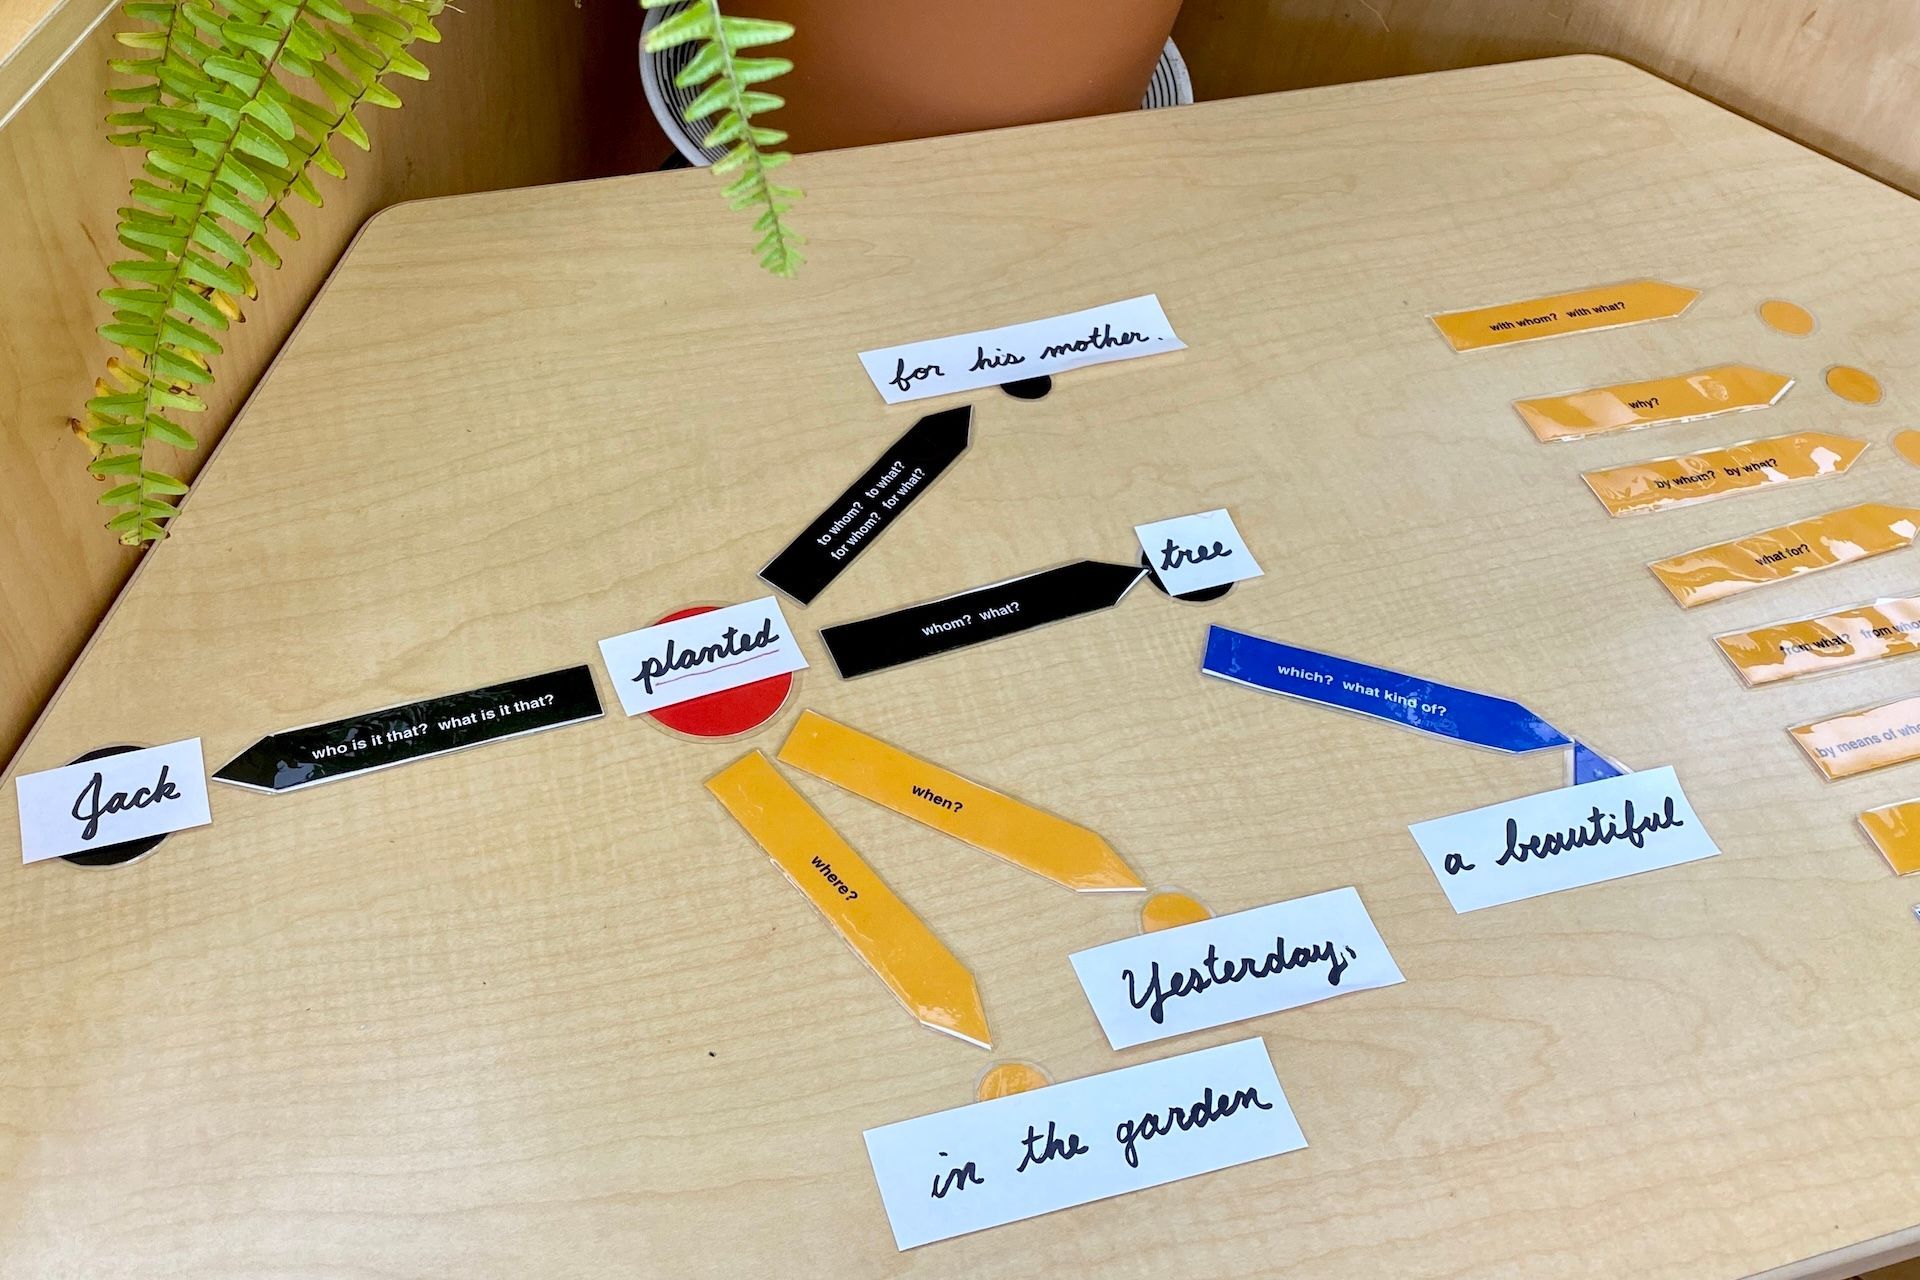
Discover the magic of Montessori sentence analysis! Help children explore grammar through hands-on activities, fostering a love for language and writing.

Explore the final stage of human development (ages 18-24) through a Montessori lens—where independence, purpose, and meaningful societal contributions take shape.
Explore the transformative adolescent years (ages 12-18) through a Montessori lens, fostering independence, social growth, and meaningful contributions to society.
Discover the key traits of childhood development (ages 6-12) and how Montessori education nurtures reasoning, independence, and social growth in this crucial stage.
Discover how Montessori education nurtures children's growth from birth to six years old, fostering independence, exploration, and language development.
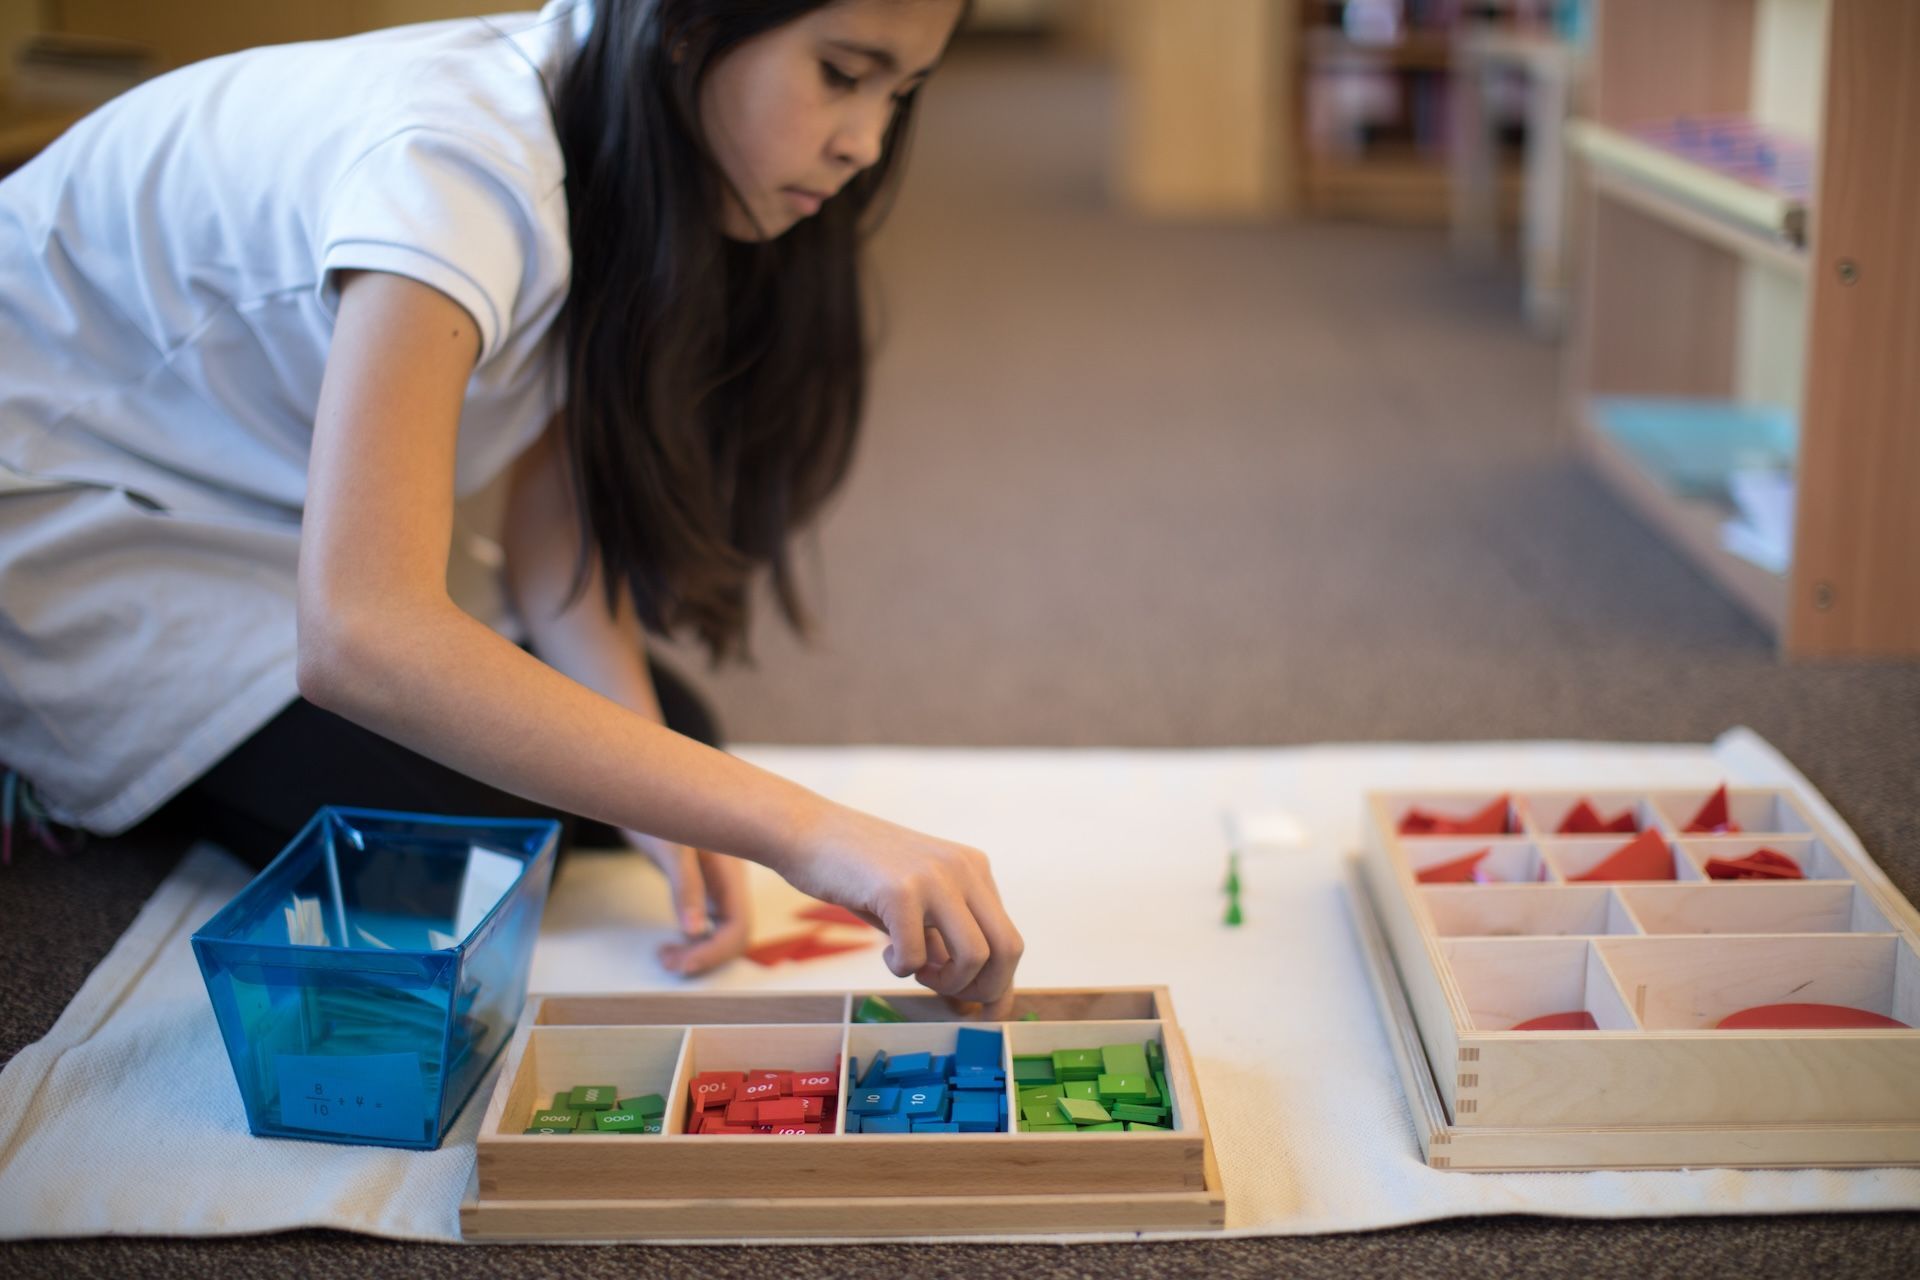
Whether we embrace math or not, humans have a tendency to think in patterns, quantify, and make logical connections. Some even say we have a mathematical mind! Young children also have this innate ability and inclination, so in Montessori, we take advantage of this propensity for mathematical thinking and offer learning experiences that provide an in-depth understanding of math even at a young age. Organized into six general groups, the mathematical exercises in the Children’s House span from a foundational understanding of the numbers one to ten, to working with very large numbers and place value within our decimal system, to internalizing number facts, and even early work with fractions! Numbers 1 to 10 Although learning the numbers 1 to 10 sounds simple, it actually involves the integration of several distinct concepts. The beauty of the Montessori materials is that they isolate each separate concept so that children’s understanding grows in progressive steps. This first group of exercises in the Children’s House aims to teach the names, symbols, quantities, and sequence for the numbers 1 through 10. The youngest children first use the number rods, which are color-coded with alternating red and blue sections to designate the quantities of one through ten. As children work with the number rods, they solidify the concept of quantity as a single entity while also practicing one-to-one correspondence. The sandpaper numbers help children learn the symbolic representation of numbers. After children master the sandpaper numbers and can easily identify numerals, we help them connect the number cards with the corresponding number rods. Additional materials–like the spindle boxes, cards and counters, and the memory game–help children progress from understanding quantity as a single entity to grasping how quantity can be a set. Throughout this progression, we offer experiential exercises to help children learn the concepts of addition, subtraction, multiplication, and division. At this stage, we don’t provide the vocabulary but rather give an impression of the concept of each operation. The Decimal System Once children have mastered the numbers 1 to 10 activities, they are ready to begin exercises with the golden beads. Because there are never more than nine in a given place value, and children already know the quantities and the symbols, they are ready to learn the hierarchy of units, tens, hundreds, and thousands. As children set up the golden beads, the primary decimal system materials, they learn how to think through the process of each operation and the concepts of calculation. Are they putting quantities together or taking them apart and recounting the categories? The decimal system work gives children knowledge of the mathematical processes and solidifies their understanding of the mechanics of the decimal system. We focus on helping children understand the process of each operation. We aren’t looking for the right answer. We want the child to understand the operations and what adding, multiplying, dividing, or subtracting means. After children understand the operations with the golden beads, we offer other materials, such as the stamp game and dot game, to help them move away from a very concrete toward a more symbolic representation of the quantities. We offer word problems at the end of this series, which help verify whether children understand each operation's process. Continuation of Counting Through this group of exercises, children learn the name, symbol, and quantity of the numbers from 11 to 100, and consolidate linear counting up to 1,000. The work starts with the teen boards (11 through 19) and tens boards (20 to 100). We also introduce the colored bead stair, which gives a color-coded sensorial representation for quantities of one through ten, a pattern replicated throughout the Montessori math materials. With the golden beads, children experience the difference between 100 and 1,000, by weight and geometrical representation. In continuation of counting, children lay out the bead chains and see the dramatic linear difference between 100 and 1,000. Children also use the bead chains to practice skip counting, which lays the foundation for further studies in multiplication. We also make sure there is lots of counting in the classroom! Children can be taught to count by rote, but mental maturity helps them take the leap from rote counting to understanding quantities represented by numbers. Exploration and Memorization of the Tables Through a variety of materials–the addition strip board, addition snake game, subtraction strip board, subtraction snake game, multiplication bead board, bead bars, and unit division board–children have lots and lots of practice with the essential math facts. This concrete exploration establishes a visual understanding of what something like 5 x 6 looks like and helps children establish early neural pathways for memorizing these math facts. After children use different forms of bead material to practice, they move into more abstract representations of quantity and eventually even use blank charts to test their memory. All of the repetition in this exploration phase leads to memorization as children become aware of which combinations they know and which they don’t know. Eventually, after a lot of practice and repetition, children realize that it is faster to do the calculations mentally rather than with the materials. As children reach the end of their primary years, they want to be more efficient. At precisely this point, they are ready to begin the last group of exercises, called the passage to abstraction. Passage to Abstraction In the exercises for passage to abstraction, children connect the skills and concepts from the previous strands of learning, and their knowledge base shifts from understanding the concepts experientially to understanding them logically. With the small bead frame, children revisit the process of addition and subtraction. With the wooden hierarchy material, children get a sensorial and symbolic introduction to the quantities ten thousand, one hundred thousand, and one million. This material also prepares children for the large bead frame and experiencing the multiplication of large numbers with a single-digit multiplier. The racks and tubes material allows children to begin dividing with larger divisors and dividends. With all of this concrete experience working with larger quantities, children are well on their path to abstraction. Fractions The final material in the mathematical progression is fractions. In the Children’s House, we have already helped the youngest children explore fractions sensorially. They return to this material from a mathematical perspective to understand quantities smaller than one unit. In addition, children begin simple operations with the fraction material and start to explore the equivalence of fractions. In the Children’s House, the progression we use for all of these exercises helps children deeply solidify their mathematical understanding. We first ensure children have strong concrete experiences, followed by more symbolic representations. After children associate the concrete and the abstract, we offer lots of activities for practice, repetition, and verification. In the process, we support children’s growth in classification, comparison, and reasoning. We invite you to come see children’s mathematical minds in action. Schedule a tour today!

Most of us have had the experience of a child walking into the room and proclaiming, with exasperation and desperation, “I’m bored!” Without even thinking, we begin to offer suggestions. Despite our best intentions, this situation tends to not end well. Our brilliant ideas are often quickly refuted. We feel frustrated. Our children haven’t engaged. And we’ve missed an opportunity to help our children take responsibility. What Does it Mean to “Own the Problem”? It helps to think proactively about how to respond when our children face problems, choices, or situations. These aren’t necessarily the big issues, but rather daily moments that can help our children learn important coping skills that will be crucial in their lives. At its core, figuring out who owns the problem is about determining whether we or our children are the ones who are primarily responsible for addressing an issue. For example, when our children forget to bring something to school (a coat, gym shoes, snack, etc.), it’s their problem to own and solve because they are directly impacted. Plus, they are also capable of problem-solving (e.g. borrowing a coat, talking to their teacher, asking if there is any food they can have for a snack). Owning the problem helps children take more responsibility and learn from their mistakes. Whereas, if we rush to their rescue and bring anything that was left at home, our children learn that remembering to bring essential items isn’t really important because we take care of covering for them. The Challenges However, watching our children struggle can be heart-wrenching. We don’t like to see our children upset, in pain, or even frustrated. Often, without even thinking, we jump in and try to protect our children from whatever problem, conflict, or challenge they are experiencing. In addition to this urge to rescue, we may also experience time constraints, diminishing patience, worry about how others will perceive the situation, doubts about our children’s capability, and even pushback from our children. It may seem faster to tie our children’s shoes or clean their messy room than to wait for them to do it themselves. We may worry that our children won’t meet expectations with a school project or that teachers, other parents, or extended family members will judge the results if we don’t help. Or maybe we aren’t sure that our children will make the “right” decision or if our children are mature or skilled enough to handle a situation. We may even feel guilty about allowing our children to face the natural consequences of their actions, even though it’s a necessary part of learning. The Value All problems have owners. Being thoughtful about who owns the problem helps create a clear boundary between guiding our children and taking over their challenges, which is crucial for raising independent, confident, and capable individuals. If we take the time to think ahead about specific (and even recurring) situations, we can be prepared to empower our children to take ownership of the challenges they face, rather than automatically intervening. It’s also important to remember that if we regularly take ownership of our children’s problems, we are inadvertently teaching our children that they are not capable. The result? Our children grow more needy and dependent on (and sometimes even more demanding of) adults. If our children own the problem, we can let them handle the problem and provide support as necessary. This is a growth opportunity for us and our children! Steps to Take The next time our children express frustration or emotion in response to a problem they own, we can try a simple, three-step response. Tell them what we see When our children approach us, consider using detective skills to determine what emotion is at play. “It looks like you don’t know what to do right now,” or “It looks like you are disappointed,” or “It looks like you are feeling sad.” This simple first step provides acknowledgment and helps children accept that their feelings are normal and acceptable. For younger children, this also helps them learn to identify different emotions. In addition to validating our children’s feelings, active listening shows empathy and helps us avoid jumping to solutions. For example, if the upset is about an interaction with a friend, we can try saying something like, “That sounds really frustrating. Tell me more about what happened." Ask them what they can do Next, we can act as a coach rather than trying to provide solutions. This requires listening closely to determine the root cause of their problem and helping them come up with a solution (without doing it for them). For example, if facing the “I’m bored” statement, we can ask questions, “What do you think you could do on your own so that you would feel busy?” Even if they respond by saying, “I don’t know,” we can continue to focus on their ability to think through possibilities. Sometimes, even just replying with something like, “make believe you know,” grants them permission to use their imagination. Additional types of questions to have mentally prepared can include: “What do you think you could do to fix this?” “How do you think _____ might react if you explain?” “What’s the first step you could take?” Offer to help if appropriate Once our children have come up with a solution to their problem, we can offer to help without taking over and implementing the solution for them. Sometimes our children might need support with generating ideas. It’s okay to brainstorm together, which is different than trying to come up with solutions for them. If we do offer brainstorming support, it’s important to let our children choose the best course of action. For example, if the problem revolves around forgetting to bring something to school, we can help with some scaffolding, “Let’s think of ways you have remembered to bring your instrument for band. What’s one technique you’ve used before that worked well?” We can also offer support by providing access to tools or resources. For example, if the struggle involves organization, we can offer to provide a calendar or checklist and teach our children how to use this tool rather than organizing their assignments or chores for them. Role-playing can also sometimes help children practice the solution they’ve identified. Ultimately, we want to set clear exceptions by letting our children know what is expected and giving them the responsibility to follow through. Asking what their plan is is a great way to shift the focus to their ability to solve the problem. The best part is that the more often we allow our children to solve their own problems, the more capable they become. Are you curious to learn more about supporting children’s emerging sense of responsibility? Come visit our school!